
Unleash YOLO Mode for Claude Code in Windows WSL2

Introduction
I’ve been using AI coding assistants for a while now. Anthropic’s Claude Code is my current favorite, and I use it daily for tasks ranging from simple coding jobs to Windows OS automations, massive refactors, and full feature development. Sometimes I just want to let the agent loose—and if it’s on the right track, review its work when it’s done.
You can do that with the virtual environments that Anthropic or OpenAI provide (like Codex), but those are often restrictive. You’re limited by what these companies give you—features of the environment (can I run containers?), processing speed, and power—and you can’t see results as instantly as when these tools run locally.
In this post, I’ll show you how to leverage what’s known as Claude Code YOLO mode: a way to run Claude Code without permission prompts. It can do whatever it wants—run wild while it figures out the problem you’ve given it. I’m a firm believer that to unlock the full potential of these tools, you need a constrained sandbox where you can give them full permissions safely and see what they’re capable of.
Our objective will be to minimize permission interruptions and maximize autonomy—with as little guidance as possible.
Requirements
To follow this guide, you’ll need a Windows machine with Virtualization Enabled. You’ll also need Docker Desktop installed if you want to leverage Docker inside the virtual environment.
Enter WSL2
A virtual environment is the first thing that comes to mind. You could go full virtual machine with VirtualBox, but we can go lighter with WSL.
The Windows Subsystem for Linux (WSL) lets you run Linux distributions (like Ubuntu) inside Windows without needing a traditional VM. You can learn how to install WSL and pick a distro here.
For my setup, I picked Ubuntu 24.04.
# Install the distro
> wsl.exe --install "Ubuntu-24.04"

# Check it
> wsl.exe --list
Ubuntu-24.04

# Enter it
> wsl -d Ubuntu-24.04
kostas@ANDROMEDA:/$
Disable Automount
By default, WSL automatically mounts your Windows filesystem. Remember when I said we’d let this little beast loose? Giving it access to all your files—including Windows and Program Files—isn’t the best idea.
We’ll be very selective about what files it can see by default. We’ll achieve that by modifying two files: /etc/fstab and /etc/wsl.conf.
Disable Automount
Open /etc/wsl.conf (create it if it doesn’t exist) and set the following values:
[automount]
enabled=false
mountFsTab=true

[interop]
enabled=true
appendWindowsPath=false
This disables automount, ensures only the directories listed in fstab are mounted, and prevents WSL from appending your Windows PATH (which can have odd side effects).
Pick the folders you want to share
Now open your fstab file:
sudo nano /etc/fstab
The first two lines are required for the Visual Studio Code WSL extension so that you can connect from VS Code. If you don’t plan to use VS Code, you can omit them.
The third line mounts your c:/dev folder, which is where I keep my code. Adjust paths as needed.
c:/Users/konst/.vscode/extensions   /mnt/c/Users/konst/.vscode/extensions   drvfs   defaults,ro   0   0
c:/Users/konst/vscode-remote-wsl    /mnt/c/Users/konst/vscode-remote-wsl    drvfs   defaults,ro   0   0
c:/dev    /mnt/dev    drvfs    defaults,metadata,uid=1000,gid=1000,umask=022    0    0
Once you’re done, restart WSL:
wsl.exe --shutdown
# Wait a few seconds...

# Jump back in
> wsl -d Ubuntu-24.04
Providing Docker
My setup uses Aspire and TestContainers to run tests and projects, so Docker needs to be available.
First, install Docker Desktop.
Configure Docker to use the WSL2 engine
In Docker Desktop settings, enable these options:
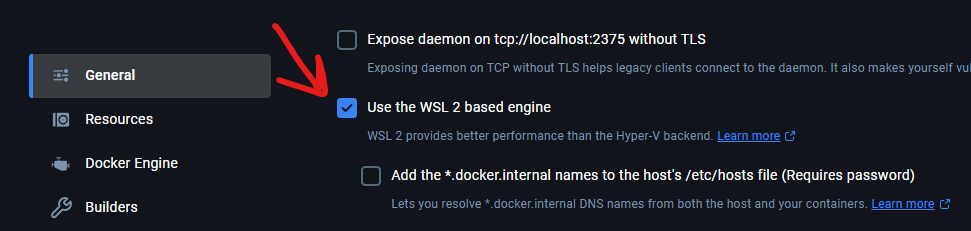
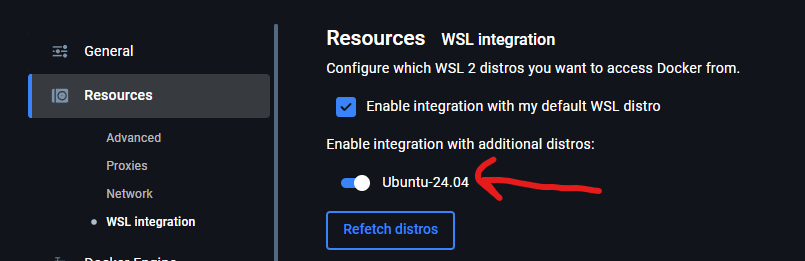
Now restart your WSL distro as before, and the docker command will be available in your terminal.
Install Node.js in WSL
Next, install Node.js and npm so we can run Claude Code.
sudo apt update
sudo apt install -y ca-certificates curl gnupg
curl -fsSL https://deb.nodesource.com/setup_20.x | sudo -E bash -
sudo apt install -y nodejs

# Verify installation
node -v
npm -v

# You should see
v20.x.x
10.x.x
Install Claude Code in WSL
Now that we have npm, install Claude Code globally:
npm install -g @anthropic-ai/claude-code
Finally, Turn YOLO Mode ON
Moment of truth.
claude --dangerously-skip-permissions

After a few prompts, you’ll land in this menu with bypass permissions enabled:

Out of Scope
Git commits and pushes are out of scope for this post. To allow Claude to commit and push, you’d need to configure SSH keys and give it access to your repositories.
For now, you can configure .gitconfig so it can stage and commit locally, but sharing your SSH keys gives it more power than I’d recommend in YOLO mode. It’s safer to ask it to commit its work, then manually review and push yourself.
Conclusion
In this post, we learned how to unleash Claude Code’s full power locally by giving it unrestricted permissions inside a controlled environment.
Go now—fix a bug, refactor something, and watch it in action.
Handwritten by Kosta and slightly polished with ChatGPT 5.1.
Comments